
Transitions with CoreAnimation
I have come across an interesting UX use case on medium.com recently: a concept of a banking mobile app. Not only this concept looks impressive when it comes to usability in comparison with pretty much every mobile banking app, it also has a couple of neat and engaging UI design tricks that really catch your eye. Actually, I liked it so much I decided to quickly implement a couple of those kick ass animations in a real iOS app.
The one I particularly had in mind was the animation for revealing the user photo on this particular screen.
Luckily, I already had an app for that — MyCV app, a small project I had developed as a demo of my cv. Long story short, that’s what we’re trying to achieve here (in slow motion).
 As you see, the animation consists of two parts: drawing the circle outline for the image, and revealing the image itself. Note, that the image is not being resized during this uncovering part, but is rather masked with an expanding… Eh… Mask. Also, to make it look astonishingly cool the exposing part of the animation is not instantiated right away. It’s silently waiting for a half of the circle to be drawn, and only then the revealing kicks in. It’s like exactly as the user starts wondering what this whole circle ring is about — BOOM! — the image pops up, and suddenly it all becomes clear. Minds blown.
To keep it simple, let’s make some assumptions. Assumption one: you have an Xcode project and you’re more or less familiar with a regular structure of one. Yes, we’re not messing around here. Assumption two: the code you’re about to step into can be placed into a UIViewController or UIView, whichever you prefer. Just make sure you have two properties that you can access.
@property (nonatomic, weak) IBOutlet UIView *viewToDrawOn;
@property (nonatomic, weak) IBOutlet UIView *imageToReveal;
 Where
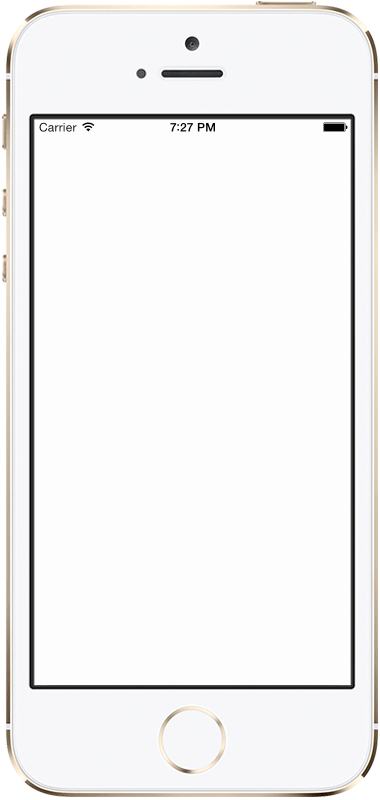
Where imageToReveal is a subview of the viewToDrawOn. To make it clear, the viewToDrawOn is the one we’re going to draw on, and the imageToReveal is the one we’ll be revealing. You never would’ve guessed, would you? They’re Interface Builder outlets here, since I’ve set them up in the storyboard. This is also the reason why they’re weak properties: you don’t need strong references to something that will automatically end up in the view hierarchy anyway. You can see on the picture to the left how the views should relate.
Please, also mind, that the imageToReveal should be hidden initially. I did it in the storyboard, since the less code we have — the easier it is to get one’s head around it.
Now, some code, at last. What we’re going to use here is CABasicAnimation. It allows you to animate some properties of your CALayer objects — and that is extremely helpful, since the circle outline and the mask that’s revealing the image are both CAShapeLayer objects. Let’s start with the circle.
Drawing the outline
First, we create the shape that will later find itself to be a nice and shiny circle around the image.
//The shape of the outline — circle, obviously
CAShapeLayer *circle = [CAShapeLayer layer];
//It should cover the whole view, so...
CGFloat radius = self.viewToDrawOn.frame.size.width / 2.0f;
circle.position = CGPointZero;
circle.path = [UIBezierPath bezierPathWithRoundedRect:self.viewToDrawOn.bounds
                                         cornerRadius:radius].CGPath;
//We set the stroke color and fill color of the shape
circle.fillColor = [UIColor clearColor].CGColor;
//Don't freak out, I'm simply using a UIColor category that creates UIColor objects out of a string holding its hex value.
circle.strokeColor = [UIColor colorWithHex:@"ffd800"].CGColor;
circle.lineWidth = 1.0f;
[self.viewToDrawOn.layer addSublayer:circle];
Now it’s time to animate the shit out of this shape! The property we’re about to animate is strokeEnd, which is, surprisingly, the end of the stroke of this shape’s path. We configure a couple of other options as well, most of them speak for themselves.
//Here we create the animation itself, We're animating the end position of the stroke, which will gradually change from 0 to 1 (making a full circle)
CABasicAnimation *drawAnimation = [CABasicAnimation animationWithKeyPath:@"strokeEnd"];
drawAnimation.duration = kAnimationDuration;
drawAnimation.repeatCount = 1.0;
drawAnimation.fromValue = [NSNumber numberWithFloat:0.0f];
drawAnimation.toValue = [NSNumber numberWithFloat:1.0f];
drawAnimation.timingFunction = [CAMediaTimingFunction functionWithName:kCAMediaTimingFunctionEaseInEaseOut];

[circle addAnimation:drawAnimation forKey:@"drawOutlineAnimation"];
Revealing the image
Now, that is very similar to what we have done already. We create a circle shape and animate the change of one of its properties. In this case it’ll be the shape path — from a tiny circle with 1px radius to a full circle shape uncovering the image. The other difference is that we use this shape layer not to draw something, but to mask the existing image, so that when the shape changes, we can see different portions of that image.
//The initial and final radius' values of the shapes
CGFloat initialRadius = 1.0f;
CGFloat finalRadius = self.imageToReveal.bounds.size.width / 2.0f;

//Creating the shape of revealing mask
CAShapeLayer *revealShape = [CAShapeLayer layer];
revealShape.bounds = self.imageToReveal.bounds;
//We need to set the fill color to some — since it's a mask shape layer
revealShape.fillColor = [UIColor blackColor].CGColor;

//A set of two paths — the initial and final ones
UIBezierPath *startPath = [UIBezierPath bezierPathWithRoundedRect:CGRectMake(CGRectGetMidX(self.imageToReveal.bounds) - initialRadius,
                                                                             CGRectGetMidY(self.imageToReveal.bounds) - initialRadius, initialRadius * 2, initialRadius * 2)
                                                     cornerRadius:initialRadius];
UIBezierPath *endPath = [UIBezierPath bezierPathWithRoundedRect:self.imageToReveal.bounds
                                                   cornerRadius:finalRadius];
revealShape.path = startPath.CGPath;
revealShape.position = CGPointMake(CGRectGetMidX(self.imageToReveal.bounds) - initialRadius,
                                   CGRectGetMidY(self.imageToReveal.bounds) - initialRadius);

//So now we've masked the image, only the portion that is covered with the circle layer will be visible
self.imageToReveal.layer.mask = revealShape;

//That's the animation. What we animate is the "path" property — from a tiny dot in the center of the image to a large filled circle covering the whole image.
CABasicAnimation *revealAnimationPath = [CABasicAnimation animationWithKeyPath:@"path"];
revealAnimationPath.fromValue = (__bridge id)(startPath.CGPath);
revealAnimationPath.toValue = (__bridge id)(endPath.CGPath);
revealAnimationPath.timingFunction = [CAMediaTimingFunction functionWithName:kCAMediaTimingFunctionEaseInEaseOut];
revealAnimationPath.duration = kAnimationDuration/2.0f;
revealAnimationPath.repeatCount = 1.0f;
//Set the begin time, so that the image starts appearing when the outline animation is already halfway through
revealAnimationPath.beginTime = CACurrentMediaTime() + kAnimationDuration/2.0f;
revealAnimationPath.delegate = self;
//Since we start the image reveal animation with a delay, we will need to wait to make the image visible as well
dispatch_time_t timeToShow = dispatch_time(DISPATCH_TIME_NOW, (int64_t)(kAnimationDuration/2.0f * NSEC_PER_SEC));
dispatch_after(timeToShow, dispatch_get_main_queue(), ^{
    self.imageToReveal.hidden = NO;
});

revealShape.path = endPath.CGPath;
[revealShape addAnimation:revealAnimationPath forKey:@"revealAnimation"];
For those wondering why I didn’t put these CABasicAnimation objects into a CAAnimationGroup — yes, that would be handy, but unfortunately we can’t group animations that are applied to different views/layers. Well, I agree that setting up a delay for the second animation might not be the most elegant solution, so if you have something better in mind — feel free to explain yourself in comments.
So, this is it, you should get something similar to this.
You can download the completed project from here. I have also used this code in my MyCV application alongside with a couple of other animations I found particularly relevant. Thank you for getting through all this swearing and poor jokes, now feel free to comment and share!
Leave a Comment