
Running TensorFlow with Jupyter Notebook on AWS
Google’s open source TensorFlow is one of the most promising machine learning frameworks nowadays. Even though Google is said to use a slightly different version internally, and the current version of TensorFlow is somewhat behind its competitors performance wise, one can hardly argue that it has a lot of potential. So if you are into data science the chances are that you will at least give it a go sooner or later.
Duh, I’m here for the iOS stuff
When it comes to iOS development it’s even more interesting! TensorFlow has recently received mobile support including an option to build it for iOS devices. Not to mention a new set of machine learning tools in iOS 10 SDK, like specifically designated kernel Metal shaders for convolutional neural networks — meaning that they will use most of the device’s GPU for parallel computations with an interface allowing you to import TensorFlow models. Not like there hasn’t been any attempts before to use Metal for machine learning, but receiving native support would be a huge leap forward.
However, mobile support does not mean that you are going to use TensorFlow for learning on a mobile device. You are still expected to train your model in a lab, tweak and improve it the best you can, and then deploy it on various platforms — including iOS devices, which, with all the native Metal support, should now work pretty fast.
In a lab? Like, actual lab?
Now, when it comes to a “lab” you still need a lot of computational resources in order to do the painful process of training your model. You may be tempted to use TensorFlow with your own GPU, but not only a powerful GPU could cost you an arm and a leg, but you need to also make sure it’s a NVIDIA card, since TensorFlow currently only supports proprietary CUDA GPUs architecture standard (as opposed to open AMD’s OpenCL). Since I’m stuck with my 2015 MacBook Pro with AMD GPU onboard, I can’t use TensorFlow with GPU on my machine, which, as one could imagine, is a huge bummer.
And that’s where Amazon comes in with their AWS service. AWS is a on-demand computing platform that lets you use their computational resources and only pay for what you use. There is a wide range of machines you can, well, rent, and there are a couple of options with powerful NVIDIA GPUs that are of particular interest to any data scientist. The cheapest GPU-powered instance (g2.2xlarge) would cost you ~$0.65 per hour. You can also bid on so called spot instances that utilise Amazon’s unused resources (and therefore might suddenly get interrupted, although apparently it’s not happening too often) — for as little as ~$0.07-$0.10 per hour.
Since I prefer working in Jupyter Notebook (previously known as IPython Notebook), AWS fits perfectly into this workflow: you fire up a cloud machine instance running Notebook kernel with TensorFlow installed, and connect to the Jupyter Notebook server remotely from your browser. So basically it means that you work in exactly the same environment you do locally, running your notebooks in a browser, the only difference being that now they are backed by a powerful GPU. I mean, how cool is that?
Oh boy oh boy oh boy!
Luckily, there is already an amazing tutorial on configuring your AWS instance and installing TensorFlow and Anaconda with Python and Jupyter Notebook. Even better, the author provides you with a script that automates the whole process. I mean really, it saved me a whole lot of time. All you need to do now is configure remote access to your Jupyter Notebook server.
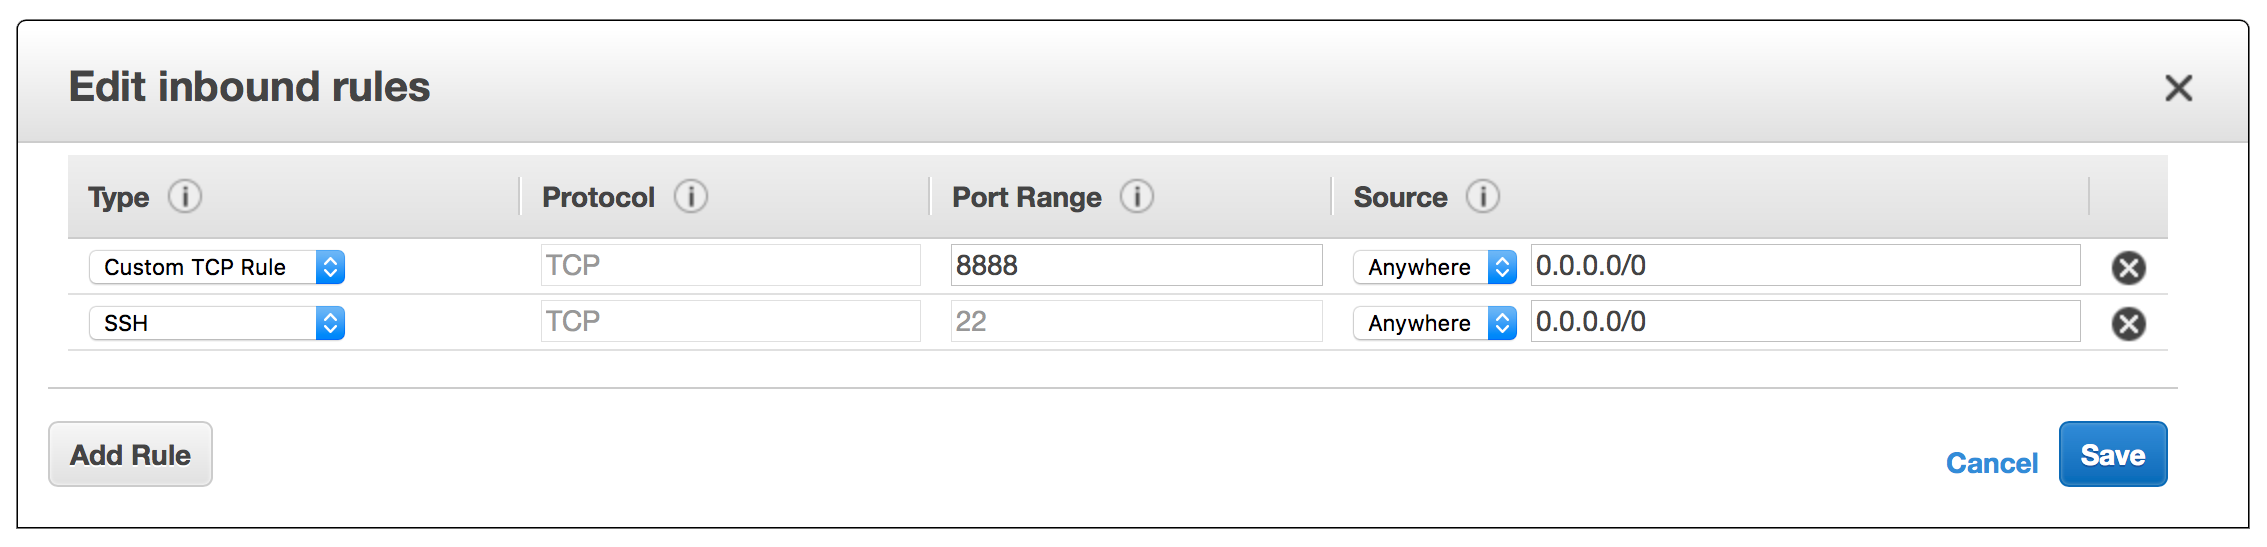
Add a security group rule
Log in and go to the AWS Console. Select Security Groups in the side panel and choose the group you have added while following the tutorial (my-sg one). Now, select Inbound and click Edit, you can now add another custom TCP rule for port 8888. It should look like that:
Configure Notebook
Now you need to configure the Jupyter Notebook on your AWS instance and set a password. I highly encourage you to use an amazing script found in this tutorial:
Don’t forget to set a password by providing SHA1 of your password in the script. As tutorial suggests, one way to do that would be using IPython:
from notebook.auth import passwd
passwd()
You will then be prompted to provide a password, and once provided and verified, you will get a SHA1 hash of it. It will look something like this:
'sha1:iiUsjkmXmB7fqk89beNg3uDeD8LGJ248e3ZMtsCXRo6xePnAZs'
Now make a local copy of jupyter_userdata.sh and put the hash of your password in the following line:
c.NotebookApp.password = u'sha1:bcd259ccf...<your hashed password here>'
Unlike the tutorial suggests, I prefer to upload your password-enabled copy of jupyter_userdata.sh to Dropbox, copy public link and use wget to download the file on your AWS instance. This is what you are going to execute when connected via ssh to your remote AWS machine:
wget https://YOUR-DROPBOX-URL/jupyter_userdata.sh
chmod +x jupyter_userdata.sh
./jupyter_userdata.sh
Ok, looks like you are all set. You should now be able to ssh into your AWS machine, run jupyter notebook and then connect to it from the browser via the following URL: https://AWS-INSTANCE-IP:8888, where AWS-INSTANCE-IP is a public IP of your running AWS instance. Your browser will warn you that the website you’re trying to open uses a self-signed certificate (which is fine, since we self-signed it) — just breeze through all those warnings and you should see the Jupyter Notebook login page. Type in the password you used in jupyter_userdata.sh and you should see familiar Notebook interface.
One minor thing though: I didn’t manage to get it working in Safari, apparently due to an annoying HTTPS issue that will let you use the Notebook, but it will never manage to connect to kernel. The workaround is fairly simple: I use Google Chrome instead.
What a pain to connect though…
Yeah, I know. You have to type all that nonesense into the console, then get the AWS public IP, construct a URL, launch the browser and so on. It was so annoying that I wrote a couple of bash scripts doing exactly that!
In order to use them, you need to make local copies and replace AWS_INSTANCE_ID with your AWS instance ID. To find your ID go to the AWS Console, select Instances in the side panel and make a note of the Instance ID column of your machine in the list. Watch out for comments in the scripts, they will give you hints on using each one of them.
Starting an instance
This script:
- Launches your AWS instance performing some initial checks.
- Makes sure the instance network interface is initialised.
- Gets AWS instance public IP.
- Connects to it via
sshadding the IP to known hosts. - Launches browser on your local machine with remote Notebook URL.
Usage is as follows:
- Run the script.
- Run
jupyter notebookon the remote machine. - Refresh the page in the browser.
Stopping an instance
This script:
- Initiates the process of stopping your AWS instance.
- Notifies you when the instance actually stops.
Usage is as follows:
- Run the script.
- Wait till the instance has stopped. Or don’t — it should stop anyway.
Where do I go from here?
You can now work with the Jupyter Notebook just the way you do locally. As per training data and such, I prefer to transfer it to the AWS instance using wget, although in case the data is too large you will need to configure the storage capacity of your AWS machine. In the AWS language this would be instance’s attached Volume — a memory which is not wiped across instance launches.
I hope this post was helpful and, hopefully, saved you some time. Let me know if you face any issues, or in case you know how to make the whole process easier!
Leave a Comment